From an empty sheet to a released cutlist
How Wiring Studio models a harness, what it derives from that model, and how each view feeds the bill of materials and the cutlist.
Chapters
Last updated 3 September 2026
Excel import
Excel import turns a harness spreadsheet into a structured project. Drop in a workbook and an agent reads it, works out what it describes, and builds the sheet — components, wiring connections, cables, connector cavities, pin assignments and lengths. It is the fastest way to bring a harness you already document in Excel into the app without retyping it.
From spreadsheet to live harness
Most harness designs start life in a spreadsheet, and it works until it does not. Pin tables drift out of step with the wiring list. The bill of materials is retyped every revision. Nothing checks that a wire connects two cavities that exist, so copy-paste errors survive between versions. And a spreadsheet can never show you the harness — there is no formboard to check the numbers against.
Excel import is the bridge. You keep the file you already maintain, and the agent reconstructs it as a connected project: components you can move, wiring you can trace pin to pin, a BOM that recalculates itself and a Design view you can lay out.
Excel import is a Beta feature and it needs a connection — the workbook is read by a model in the cloud. It pulls out as much as it can, and how complete the result is depends on how thoroughly the spreadsheet documents the harness.
Starting an import

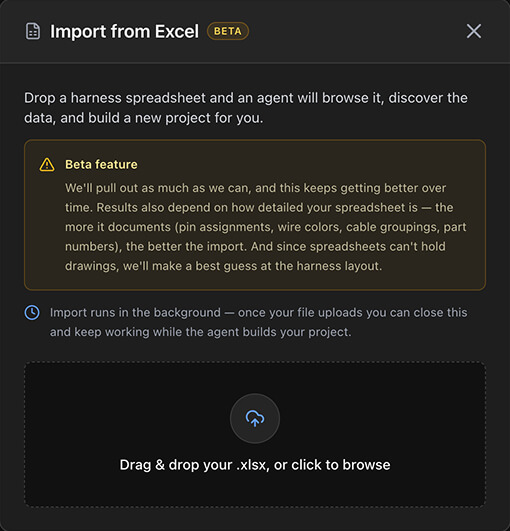
You can close the dialog and carry on working — the import does not block the app. Pick something that is not a spreadsheet and the dialog says so and waits for a valid file.
What gets imported
The agent reconstructs whatever the spreadsheet actually records:
- Components — connectors with their cavity counts and cavity labels, plus splices, diodes and resistors, with part numbers and manufacturer data.
- Wiring connections — pin-to-pin wires with wire part numbers, signal and network names, and twisted pairs.
- Pin configuration — contact parts, wire seals and per-cavity descriptions. See Pin configuration.
- Cables — lengths in metric or imperial, coverings, segments, and shielded or multi-conductor cables with per-strand connections. See Cable shielding.
- Wire colours and marking — colour codes read from cell background fills, plus heat shrink colour parts. See Wire colours and marking.
- Mechanical accessories — boots, backshells, locks, covers and grommets attached to components.
- Project settings — measurement units, cutlist multiplier, price multiplier and marker length. See Project settings.
Parts it finds are added to your parts library, so the project is wired to real parts rather than placeholders.
No template required
There is no template to fill in and no required column order. The agent reads your spreadsheet's actual layout and works out the structure from it. It recognises headings like Connector, From, To, Gauge, Length and Color, infers relationships from description and reference columns, and reads wire colour codes from the background fills you already use.
It also handles workbooks holding more than one harness — each on its own worksheet, several grouped together, or several as regions within one sheet. Each harness becomes its own project sheet, up to your plan's sheet limit; anything beyond that is folded into the last sheet.
Watching progress
Because the import runs in the background, progress appears in a floating dock rather than taking over the screen. The dock shows the current phase — parsing, planning, then extracting each harness — running counts of what has been created, and a live feed of the agent's steps.
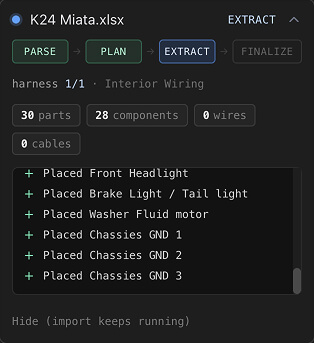
Carry on editing other projects, or dismiss the dock and let the import finish on its own. The project itself is locked while it is being built, so nothing you do can collide with the agent.
Layout and what to expect
A spreadsheet carries no drawing, so the importer cannot reproduce a formboard you never had. It makes a best guess instead, arranging components by how they connect and packing them into a clean starting point. You then move things where you want them in the Design view, the same as on any project — and Auto-Scale Layout is a quick way to fit the result to the canvas.
The design rule checks are the fastest way to see what the import could not fill in: unassigned cavities, cables with no length and parts with no price will all be listed the moment it finishes.
If an import fails
If something goes wrong, the import reports a short message naming the phase it failed in rather than a raw error, and leaves the project ready for another attempt. You can retry, and you can dismiss or hide a running import at any time without stopping it.
If an import comes back thinner than expected, open the source spreadsheet and check that pin assignments, part numbers and wire colours are actually written down. The agent can only reconstruct what the sheet records.
Tips for a clean import
- Include part numbers. Manufacturer and part-number columns let the agent match real components instead of placeholders.
- Label pin and cavity assignments. Explicit From and To cavities produce accurate pin-to-pin wiring.
- Mark twisted pairs explicitly. Note differential pairs such as CAN-H and CAN-L in the sheet rather than relying on rows being next to each other.
- Use cell fills for wire colours. Background-coloured cells are read as colour codes.
- Give real cable lengths. They feed the cut list; blank or zero lengths are left unset.
Once the import finishes, Getting started covers the editor, and Pin configuration is where you refine the connectivity the agent produced.
Related chapters
Where this chapter leads next, and what it assumes you have already read.
Parts and the library
Sixteen part categories, with the manufacturer data, pricing and properties the BOM and cut list report.
Connections and routing
The schematic: what connects to what, network names, routing, twisted pairs and shielded cables.
Pin configuration
Where the harness is wired — the wire, contact, seal and colour codes on each connector cavity.