Sheets & Workspaces
Wiring Studio projects support multiple sheets, similar to tabs in a spreadsheet. Each sheet contains its own independent set of design nodes, wiring connections, components, and pin configurations. Use sheets to organize complex harnesses into logical sections — for example, one sheet per harness variant or one sheet per vehicle zone.
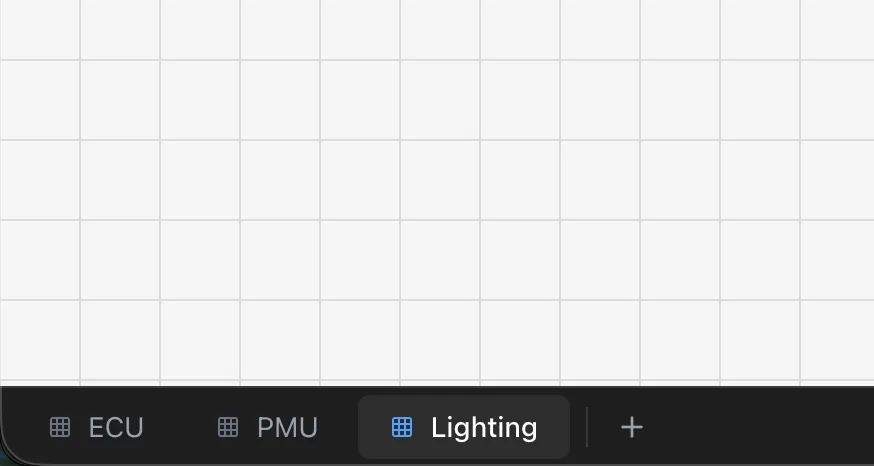
The Sheet Bar
The Sheet Bar is located at the bottom of the workspace. It displays all sheets in your project as tabs. The active sheet is highlighted with a blue indicator and bold text.
- Click a tab — Switch to that sheet
- + button — Create a new sheet
- Double-click a tab— Rename the sheet
- Right-click a tab — Open context menu with Rename and Delete options
Creating Sheets
Click the + button in the Sheet Bar to create a new sheet. The sheet is created with a default name and the editor switches to it automatically.
Sheet creation is subject to plan limits:
| Plan | Sheets per Project |
|---|---|
| Free | 1 |
| Lite | 3 |
| Pro | Unlimited |
| Team | Unlimited |
If you reach your plan's sheet limit, the + button is disabled. Upgrade your plan to add more sheets. See Pricing and Plans.
Info
Exceeding your plan's sheet limit (e.g., after a downgrade) puts the project in read-only mode. You can still view and export data, but editing is blocked until you upgrade or remove sheets.
Renaming Sheets
- 1
Double-click the sheet tab, or right-click and select Rename
- 2
Type the new name
- 3
Press Enter to save
- 4
Press Escape to cancel without saving
Use descriptive sheet names — they appear in PDF export title blocks and help identify sheets in multi-sheet projects.
Deleting Sheets
Right-click a sheet tab and select Delete. A confirmation dialog appears before deletion.
- You cannot delete the last remaining sheet — every project must have at least one
- Deletion is permanent and removes all design, wiring, component, and pin configuration data on that sheet
Warning
Deleting a sheet permanently removes all design and wiring data on that sheet. This action cannot be undone.
Sheet Independence
Each sheet maintains its own independent data:
- Design nodes and edges — Component placements and cable routing
- Wiring nodes and edges — Pin-to-pin wire connections and control points
- Components — Library parts instantiated on the sheet
- Pin configurations — Cavity-level wiring assignments
- Labels — Cable labels and markers
- Shielded cables — Multicore cable configurations
Switching sheets loads a completely separate canvas. Components and wiring on one sheet do not affect other sheets.
When to Use Multiple Sheets
Multiple sheets are useful for organizing complex wire harness projects. Common approaches include:
- Harness variants — Use one sheet per harness variant (e.g., base model vs. premium model) when variants share similar structure but differ in specific connections
- Vehicle zones — Separate sheets for engine bay, cabin, trunk, and door harnesses in automotive applications
- System separation — Dedicate sheets to specific subsystems (e.g., power distribution, sensor circuits, communication buses)
- Revision tracking — Use sheets to maintain different revision states of the same harness design
Each sheet generates its own section in PDF exports, so you can produce per-sheet documentation or a combined project document.
Workspaces
Projects in Wiring Studio belong to one of two workspace types.
Personal Workspace
Projects in your Personal workspace are owned by your user account. Only you can access them. Your personal Parts Library is separate from any organization library.
Organization Workspace
Projects in an Organization workspace are owned by the organization. All organization members can access these projects. The organization has its own shared Parts Library.
Organization features require a Team plan. See Collaboration for details on setting up organizations and team workflows.
Switching Workspaces
Use the workspace dropdown in the header to switch between your Personal workspace and any organizations you belong to. The Projects page and Parts Library update to show the selected workspace's data.
Transferring Projects
You can transfer a project between personal and organization workspaces:
- 1
Open the project
- 2
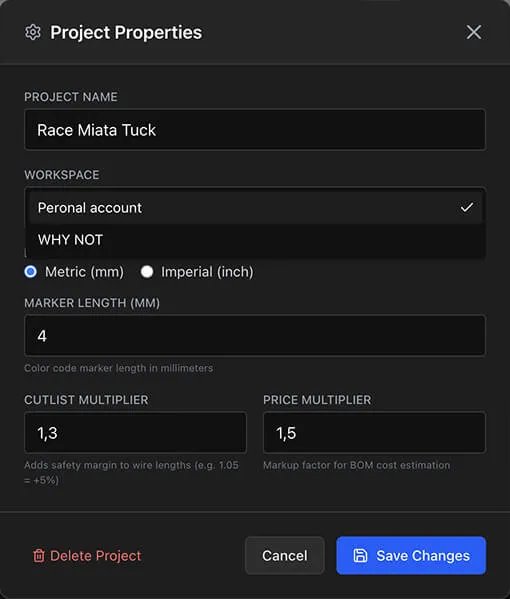
Right-click the canvas and select Project Properties
- 3
Change the Workspace setting
- 4
Save
This changes the project's ownership. Transferring to an organization makes it accessible to all org members.
Tip
When starting a team project, create it directly in the organization workspace. This ensures all team members have access from the beginning and the project uses the shared parts library.