From an empty sheet to a finished cut list
How Wiring Studio models a harness, what it calculates from that model, and how each view feeds the bill of materials and cut list.
Chapters
Last updated 23 September 2026
Printing the formboard
Print Formboard makes a different PDF from Export Project: instead of fitting the drawing to a page, it prints the active sheet at an exact physical scale, split across as many pages of a chosen paper size as it takes. Tape the pages together on the wall or the bench and you have a full-size formboard to lay cables against.
Opening the dialog
Open Print Formboard… from the actions panel, under Export, or from the Design canvas right-click menu. In the desktop app it is also Project > Print Formboard…, with no keyboard shortcut. It is only available from the Design view, and there is nothing to print until the active sheet has components on it.
The dialog always prints the active sheet, and only that sheet — one PDF per run. To print a different sheet, switch to it first.
Settings
| Setting | What it does |
|---|---|
| Paper Size | A4, A3, A2, A1, A0, Letter, Legal, Tabloid, or Single page (plotter / print shop), which makes one page the exact size of the formboard instead of tiling it. Defaults to A4 for a metric project and Letter for an imperial one. |
| Orientation | Auto picks whichever of portrait or landscape needs fewer pages, or Portrait / Landscape to fix it yourself. |
| Print Scale | 1:1, 1:2, 1:4, or a custom 1:N ratio. A smaller scale such as 1:2 prints a smaller formboard on fewer pages. |
| Scale (px / cm) | How the drawing's on-screen size converts to a physical one. Prefilled from your cables; see below. You can type a different value for this export only. |
| Overlap (mm) | The glue strip shared between neighboring tiles, in millimeters. Default 10 mm. |
| Measurement Grid | A light grid at 10 cm (metric) or 4 in (imperial) pitch, with coordinate labels, printed over the formboard. On by default. |
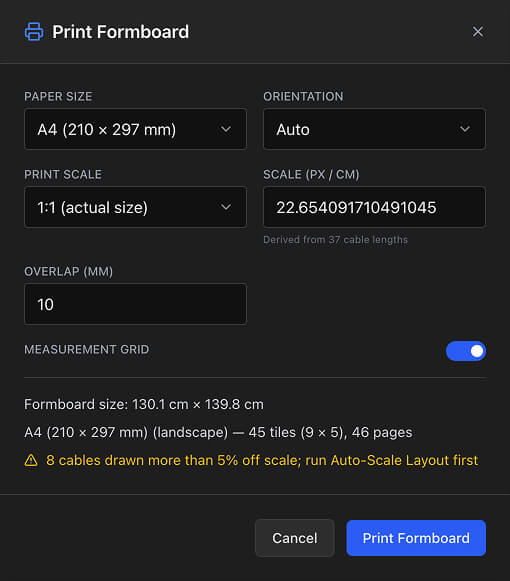
Paper size, orientation, print scale, overlap and the measurement grid toggle are remembered on this device for next time. The px per cm override is not — it is easy to forget an old override was set, and a stale one silently prints the wrong size.
A live summary below the settings shows the formboard's physical size, the paper and orientation actually used, the tile grid as rows × columns, and the total page count.
Above 100 pages the dialog warns that the job is large and suggests a larger paper size or 1:2. Above 300 pages it refuses to export, because the PDF is built in your browser's memory.
How the scale is derived
The scale is derived from your cables, the same rule the 3D view uses for cable thickness: for every cable that has a length set, Wiring Studio compares the length it is drawn at on the canvas to the length you entered, and takes the median of those ratios across the sheet. That median becomes the pixels-per-centimeter figure the print is built from, so a formboard printed at 1:1 matches your actual cable lengths.
If no cable on the sheet has a length set, there is nothing to derive a scale from. The dialog falls back to 50 px/cm and shows a warning: set a cable length, or type the scale in by hand, or the print will not be true to size.
If a cable is drawn more than 5% off the derived scale — the same threshold the length label on the canvas turns red at — the dialog warns how many cables are affected and suggests running Auto-Scale Layout first. The cover page of the PDF also prints this count, so it travels with the document.
Auto-Scale Layout, in the actions panel or the canvas right-click menu, moves components so every cable is drawn in proportion to its set length. Run it before printing if the warning appears; see Moving around the canvas.
Printing at true size
The PDF is named `<Project>_<Sheet>_formboard_1to<N>_<date>.pdf`, for example Main_Harness_Engine_Bay_formboard_1to1_2026-09-23.pdf, where N is the print scale's denominator.
Page 1: the overview
The first page is not a tile. It shows the whole sheet with the tile grid drawn over it and each tile labeled with its id — a row letter and a column number, such as B3, reading left to right and top to bottom. Beside it, a title block lists the scale and px per cm, the formboard's physical size, the paper size and page count, printing instructions, and a short assembly guide.
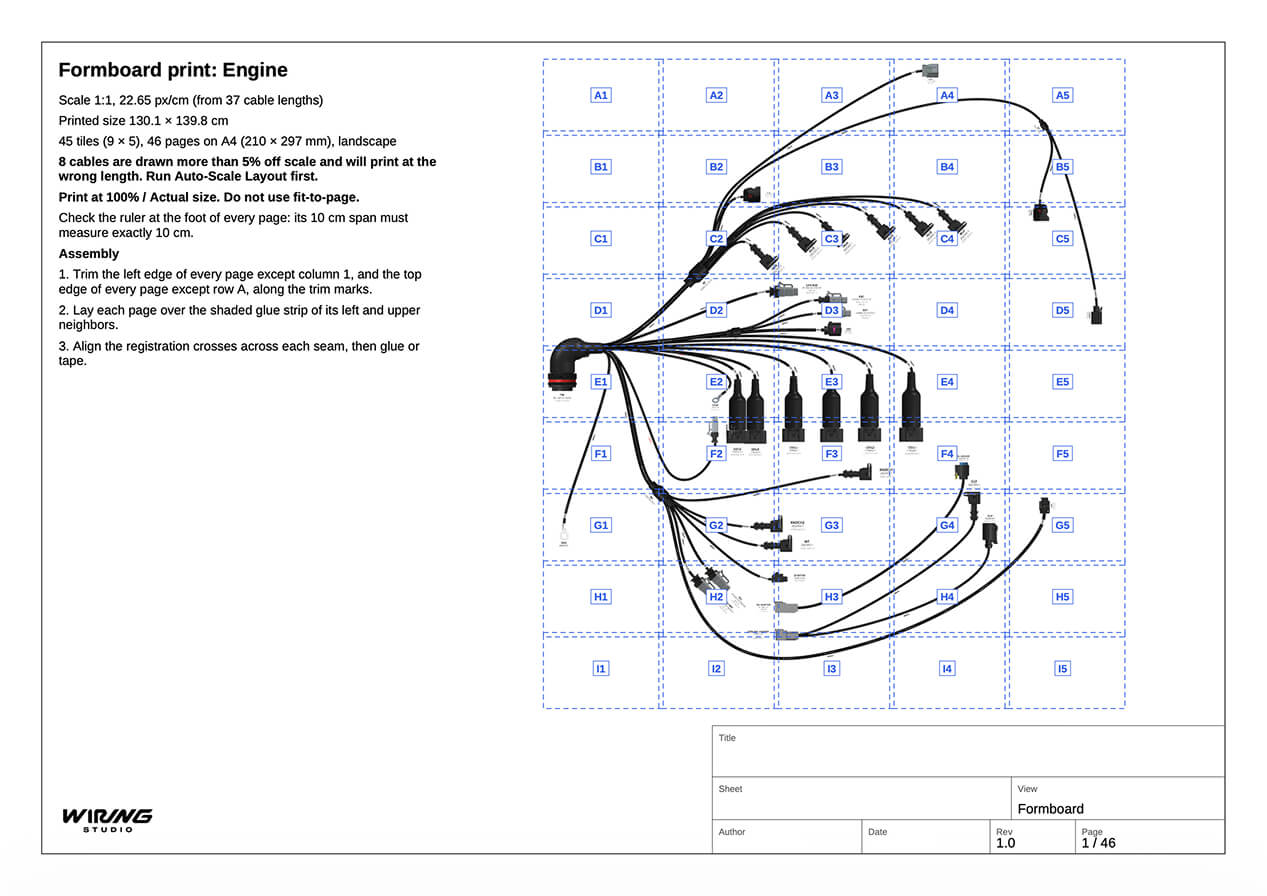
Print at 100% / Actual size. Never use your PDF viewer or printer's fit-to-page option — it would silently change the scale, and the printed formboard would no longer match your cable lengths.
Every tile page carries a calibration ruler in its footer: 10 cm with 10 mm ticks for a metric project, 4 in with 1 in and ½ in ticks for an imperial one. After printing, measure it with a real rule. If it does not read exactly 10 cm or 4 in, the page was not printed at actual size — check the print settings and print that page again before taping anything together.
Assembling the tiles
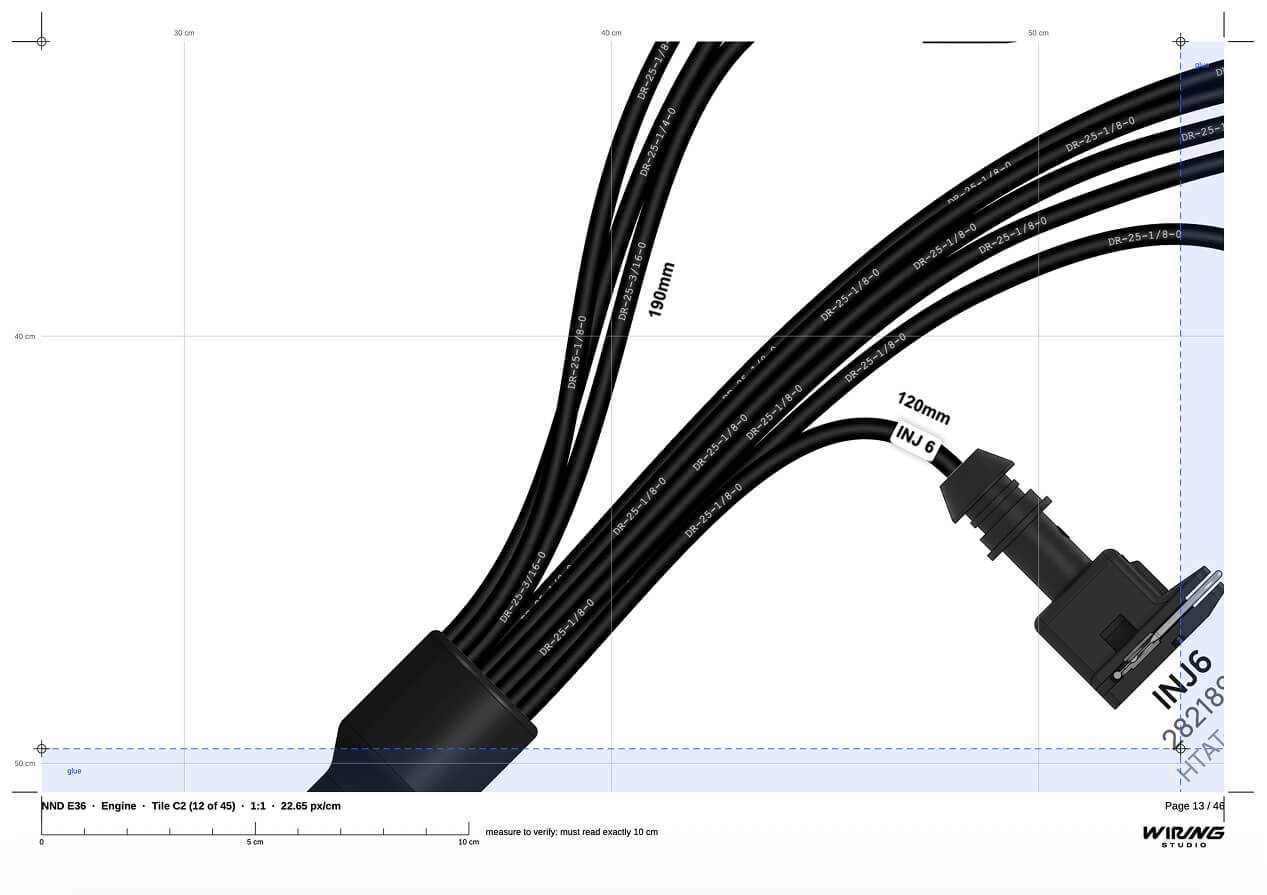
Each tile after the overview page is one page: the drawing at exact scale, with the marks you need to line it up against its neighbors.
- Trim marks at the four corners show where to cut the page.
- A shaded overlap strip runs along the right and bottom edges of a tile — the glue strip where it is meant to sit under the next tile over or down. A tile in the last column has no right-hand strip, and a tile in the last row has no bottom strip.
- Registration crosses repeat at the same physical point on neighboring tiles, so once two tiles are glued down you can check the crosses line up before trusting the seam.
- The measurement grid, if it is on, prints as light vector lines with coordinate labels, so a section can be checked against the sheet's coordinates without a full assembly.
- A footer on every tile page states the project, sheet, tile id, its position as "n of N", the scale and px per cm, the page number, and the calibration ruler described above.
Tips
- Print at 1:2 for a wall-mounted reference copy you check a harness against by eye, and keep a 1:1 print for cutting cables to length.
- A larger paper size or a smaller scale such as 1:2 both reduce the page count — check the live summary before printing a large sheet.
- Single page (plotter / print shop) skips tiling altogether: it sizes one page to the formboard itself, for a plotter or a print shop that can handle large-format paper. There is no overview page in this mode; the ruler, grid and caption sit under the drawing as usual.
- The PDF is built on your own machine, so Print Formboard works offline, the same as Export Project.
Related chapters
Where this chapter leads next, and what it assumes you have already read.
PDF export
One PDF with any combination of five views, for the sheets you choose, with columns you can turn off in each table.
Drawing the harness
The formboard canvas: placing components, routing and shaping cables, and setting cable lengths.
The desktop app
Project tabs, a native menu bar, automatic updates and designing offline, on macOS, Windows and Linux.